Arm strength is important for yoga practice, even for beginners. It prevents fatigue in resting postures and provides a stable base for inversions and flying poses. In Bakasana, the crane pose, for example, you need your triceps and deltoids to lift the body. Your shoulders are also needed for stability in these poses, which helps you focus on your breathing.
You can also do exercises to strengthen your arms to improve your overall strength. Yoga teachers usually include arm strengthening exercises in their warm-ups. Start in a hip-width stance and gently stretch your triceps with your fingertips.
Remember that these arm strengthening exercises require some practice to master.
Podcast
The most important muscles of the upper arm are the biceps, triceps and deltoids. The forearm and wrist also play a crucial role in arm strength. The biceps and triceps push and pull, while the deltoids are a combination of pushing and pulling. These muscles work together to keep your arms straight.
In addition to strengthening your biceps, you can also do other arm exercises to strengthen your shoulders. One such exercise is the supine position. This pose is a great example of strengthening the one-armed arms. In this pose, one arm lifts the body and the shoulders keep it upright. You can also complete the pose with a press, where you bend the elbow and push the body back up.
One of the most difficult poses in yoga is called Chaturanga Dandasana. It requires a solid core and strong arm muscles to perform it properly. The following eleven common yoga poses for strengthening the arms will help you develop the strength in your arms to perform this pose.
These poses can be practised independently or one after the other. You can also adapt the poses to suit your body’s needs.
Besides chaturangas, there are many other yoga poses that promote arm strength. Chaturangas are great for developing arm strength, but be sure to align them correctly to avoid injury. If you make a mistake in alignment, it can lead to shoulder pain. Another good yoga pose for strengthening the arms is the side plank. This pose trains one arm at a time and there are many variations you can play with.
Yoga is all about balance. A balanced yoga practice should strike a balance between strength and flexibility. Some people are naturally flexible, while others need to work a little on their strength. While some yoga postures are not very strenuous, others can lead to serious injury. You should discuss your options with your doctor before starting a yoga practice.
Developing arm strength in yoga can be beneficial for your body and mind. It improves your overall health and gives you a sense of personal strength and confidence. It also helps you perform weight-bearing poses with more ease.
Yoga poses for strength
Low Plank – Chaturanga Dandasana
Chaturanga Dandasana or the low plank is a basic yoga pose that requires the practitioner to maintain a parallel body line to the floor and align the elbows along the length of the body. This pose stretches the muscles, improves balance and increases overall flexibility.
The correct execution of Chaturanga Dandasana requires a balance between your core and conscious breathing. It should be practised slowly to avoid injury. Make sure that you follow safe exercise instructions.
You should never strain too much in this posture and always warm up well before practising it.
After practising Chaturanga Dandasana, you need to stretch your arms, shoulders and lower back. You can try a few relaxation postures that will relax your muscles. Beginners can try Balasana, intermediate students can practice Child’s pose and advanced students can practice Crocodile pose.
To perform Chaturanga Dandasana properly, you need to engage your core. In Plank Pose, tense your pectoral muscles and draw your shoulder blades back towards your spine. In addition, you should tense your legs. This position helps you stretch your lower back and align your upper arms.
Beginners can practice Chaturanga Dandasana in a modified form by holding the position against a wall and focusing on the alignment of your body. This can help you feel comfortable in the pose and strengthen your spine.
Mountain Pose Tadasana
Mountain is a powerful asana that requires you to root your feet firmly on the yoga mat. The pose aims to strengthen the legs and core, as well as improve posture and body awareness. It also helps to realign the limbs and joints. When doing this pose, make sure to ground your feet and lift and press into all four corners of your foot.
When performing Mountain, follow the instructions carefully to ensure proper alignment. Pay attention to the placement and actions of each part of your body and use your yoga belt to help with the posture.
Make sure you tense the muscles of the abductors when you push your feet apart. This activates these muscles in your back and relieves back pain and sciatica. There are no contraindications to the mountain, however it can cause dizziness and lightheadedness in some people. People with low or high blood pressure or pregnant women should also avoid this pose.
Chair Pose Utkatasana
Utkatasana, or Chair Pose, is a standing asana that dates back to medieval Hatha yoga. Originally it was a low squatting pose. It is one of the most difficult yoga asanas to learn and should be practised by everyone, from beginners to advanced practitioners.
The chair pose strengthens and stretches the lower body and upper back and strengthens the whole body. It is helpful to use a yoga block so that the knees face forward. If the pose is too difficult, you can support yourself with your hands on your knees to make it easier.
If you cannot do this pose by yourself, you can use a foam yoga block that you clamp between your thighs. Try to hold the block until you can get out of Chair Pose. This will help you release the tension in your body and bring it back to a neutral position. When you have reached this point, you can return to standing.
Chair Pose is a challenging posture, so it is important that you focus on your breathing when practising. Remember to consult your doctor before doing this pose if you have any injuries, chronic illnesses or balance problems.
Shoulder Stand – Salamba Sarvangasana
Shoulder stand is a yoga pose in which you raise your torso, hips and knees while stretching your feet towards the blanket. If you use blankets to support your back and neck, this pose can be easier. You can also use blocks to support your sacrum. You can also stand facing a wall to keep your balance.
This pose is often called the “mother” of all other yoga postures. The aim of each asana is to balance the mind and body, which is the ultimate goal of yoga practice. This posture, also known as Salamba Sarvangasana, requires a good amount of effort and can be challenging at first. However, with practice it can become a calming pose.
This pose is contraindicated for people with heart disease and other health problems. If you have a heart condition, you should consult a doctor before performing this pose.
A woman in her seventies was practising shoulder stand when she developed chest pain. She was able to do the pose, but afterwards she felt “uncomfortable”. It turned out that the inverted position of the pose caused a massive change in blood flow to her heart, which in turn led to a mild heart attack.
The shoulder stand is a difficult yoga pose to perform and can strain the neck. By practising it with the help of supports, you can learn to control your centre of gravity. This means that your neck will bend forward less and your torso and legs will be more vertical.
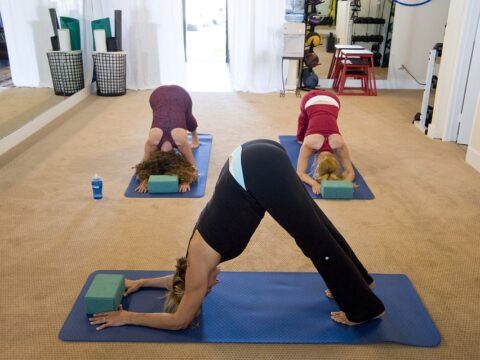
Downward-Facing Dog Adho Mukha Svanasana
Downward facing dog is a challenging and strengthening yoga pose that stretches and strengthens the back of the body. For a full body workout, perform this asana against a wall. This exercise stretches your entire back, strengthens your shoulders and stretches your hips.
To perform the asana, first bend your knees and stand on your sitting bones. Press your hips against the wall and then slowly stretch your legs. To perform a variation of the pose, lift your right leg up and extend your heel through. Place your arm behind your leg. Your head and neck should be completely relaxed.
While it is possible to try downward facing dog without a certified yoga instructor, it can be difficult to master without proper preparation. It takes at least a few months of consistent yoga practice to gain the confidence and strength to master this posture.
If you are new to yoga, it is best to start with the basic postures to build strength and flexibility. By building your strength and flexibility, you can distribute your weight more evenly throughout the pose.
When practising this asana, remember to breathe deeply. Tense your pelvic and core muscles and keep your shoulders relaxed and open. This will strengthen your whole body and stimulate your blood circulation. Downward facing dog is a great introduction to your yoga practice or to improve your overall health.
Big toe pose Padangushthasana
Before attempting the big toe pose, you should know the basic steps of the pose. In general, you need to stand wide-legged and reach your big toe with your hand. Make sure you relax your shoulders and keep your spine straight. Also, try to keep your legs straight when practising the pose.
Warm up: Before you start the pose, warm up your body by doing some yoga exercises that target the hamstrings. A good option is Adho Mukha Svanasana, a gentle inversion. This will warm up your body and prepare it for the Big Toe Pose.
Exercise: Regular physical activity helps strengthen the muscles in your feet. Ballet dancers and runners have excellent proprioceptive connections and nerves that are responsible for sensory perception. In contrast, people who do not move will experience distortions in the big toe area. A ballet dancer, on the other hand, will not experience pain.
Stretching exercises can relieve pain and improve joint mobility. A yoga instructor can modify the exercises for you to reduce the risk of pain in the joint. However, be sure to see a doctor if you suffer from pain in the big toe. The most common form of big toe arthritis is osteoarthritis. Also known as “wear and tear arthritis”, it affects the big toe joint and can cause pain when walking.
Plank Pose Phalakasana
The plank pose can be an effective way to improve your overall fitness level. You can do this exercise with dumbbells or on a bench. In the inverted row, keep one arm extended and your other arm hanging in a neutral position. While holding the dumbbell with the other arm, squeeze your shoulder blades together and keep your body straight.
The plank pose with rowing also helps you strengthen your arms. This supine position strengthens the biceps and deltoids. The rotator cuff muscles are also used in this exercise. While you keep your arm in the air, your biceps and rotator cuff muscles work together to prevent you from dropping your arms back to your sides.
If you are doing this exercise for the first time, you will need dumbbells. Make sure the weights are suitable for your current strength level. A dumbbell of five to ten pounds is a good start. The weight should be heavy enough to be challenging, but not so heavy that you lose proper form.
If you are new to the Plank pose, you should refresh your form before attempting this exercise with a heavier weight.A rowing motion during the Plank pose can work your arms, back and core. It can also work your glutes and core.
The seated forward bend Paschimottanasana
Before attempting the seated forward bend, prepare your body by sitting on a folded blanket or towel. This will help release the tension in your spine and hips, making the stretch more comfortable. Also remember to press your heels gently on the floor.
This will tighten the pelvic floor and work your core. Be sure to breathe with your partner during this exercise to ensure proper alignment.
The basic forward bend, called Padchimottanasana, is a classic yoga pose that stretches the hips and hamstrings. Begin by stretching your legs out in front of you. Keep your shoulders and spine relaxed but lifted. Your abdomen should be pulled in and firm in your thighs. Then turn your gaze to your feet and take a deep breath.
The seated forward bend is a difficult posture to master, but if you practice it correctly it can be very effective. The key to doing it well is to take a long breath as you inhale and exhale, which helps to release tension in your muscles. The seated forward bend is an excellent stretch for the hamstrings and spine.
This pose is a great way to relieve stress and build teamwork skills. It helps you shift your weight back and forth with your partner and is also a great way to teach partner yoga. You can also hold your partner’s forearm or elbow to help the other person bend forward.
Bound Angle Baddha Konasana
To perform Bound Angle Pose, begin in a seated position with knees bent and feet flat on the floor. Bend the knees and draw the heels towards the pelvis. Place your hands with palms on your shins and ankles and keep your shoulders and chin in a neutral position. Now begin to rock your legs to warm up the insides of your thighs. Once they are warm, stop flapping and stay in the pose.
Bound Ankle Pose is a good stretch for the groin, inner thighs and hips. It can help relieve sexual tension and improve circulation to the pelvis. The pose is also beneficial for women giving birth. It can also stimulate the heart, kidneys and prostate. It can also help relieve muscle tension and improve digestion.
There are a few variations of the Bound Angle Pose. Some people prefer it more upright, while others prefer it with a little more depth. A traditional Ashtanga teacher will tell you to bring your feet close to your pelvis and open your heels like a book, while a Yin teacher will tell you to keep your feet at a comfortable distance.
The Bound Angle Pose is a great warm-up for cross-legged sitting postures. It stretches the adductors, inner quadriceps and hamstrings while strengthening the back and pelvic floor. It also opens the thoraco-lumbar fascia, a structure in the hips related to piriformis syndrome.
Bridge Pose Setu Bandha Sarvangasana
Bridge pose is a yoga pose that exercises the whole body. It helps to stretch the neck, shoulders and hips. First lie on your back with your knees bent and feet flat on the floor. Place both hands at your sides, palms facing down. Bend your hips and press your feet into the floor. Hold the pose for 30 seconds to one minute.
Bridge pose strengthens the abdominal area, stretches the spine and stimulates the endocrine and nervous systems. It should not be performed by people with chronic or recent injuries. To enhance your experience, you can perform the bridge pose in combination with another pose, such as the winch relief pose.
You can also finish the sequence with a shoulder stand or Joyful Baby Pose.
Another variation of the Bridge Pose is Eka Pada, also known as King Pigeon Pose. In this challenging variation, the practitioner begins in the traditional bridge pose and slowly lifts one leg off the floor.
Then the practitioner begins to lift the other leg. This is a great variation of Bridge Pose for people with back problems. Bridge pose is a great backbend that stretches the abdominal muscles, opens the chest and improves circulation. It is also a good way to improve digestion.
The Sanskrit name of the bridge pose is Setu Bandha Sarvangasana and means “building a bridge”. This backbend is a beginner’s backbend and should only be performed by those with sufficient strength.
Warrior II Virabhadrasana II
Warrior II is a challenging yoga pose that requires a strong and flexible back. The pose has fierce physical lines but is also gentle and graceful. It is a good example of sthira sukha, the yogic philosophy that emphasises the balance between effort and ease.
Practitioners of the second warrior must balance the warrior’s mind with a commitment to ahimsa and avoid overworking their body. They can also shorten their stance and bend the back knee to relieve pressure.
When you begin, raise your upper body. Make sure your shoulders are above your hips and place your hands on your hips. Rotate your pelvis away from the side wall and align your hip points with the long edge of the mat. Then slowly open your hips and rotate them outwards.
Warrior II requires a strong back leg and hip alignment. Having your back toes pointing directly at the mat can compress your lower back. Warrior II’s rear leg strengthens the external rotators of the front thigh, which are important for hip stability. Warrior II can also be performed against a wall.
Warrior II is a powerful yoga pose that strengthens the buttocks, thighs and groin. It also stretches the shoulder blades and opens the chest. It also improves circulation throughout the body and promotes a calm, focused energy.